Google Maps API integration
- Details
- Written by M. Kanev
- Last Updated: 02 December 2018
- Created: 26 April 2017
- Hits: 12722
Due to Google Maps API changes on 16th fo June 2018, all websites using Google Maps API have to use Google Maps API keys.
You must get 2 separate keys from Google Developer Console.
Create or select a project.
Click on Enable APIs. Create a project and enable the following Google Maps APIs:
- Google Maps Directions API
- Google Maps Geocoding API
- Google Maps Geolocation API
- Google Maps JavaScript API
- Google Maps Places API for Web
Then go to Credentials > Create credentials > API key.
On the Credentials page, get an API key (and set the API key restrictions).
Note: If you have an existing unrestricted API key or a key with browser restrictions, you may use that key.
To prevent quota theft, secure your API key following these best practices.
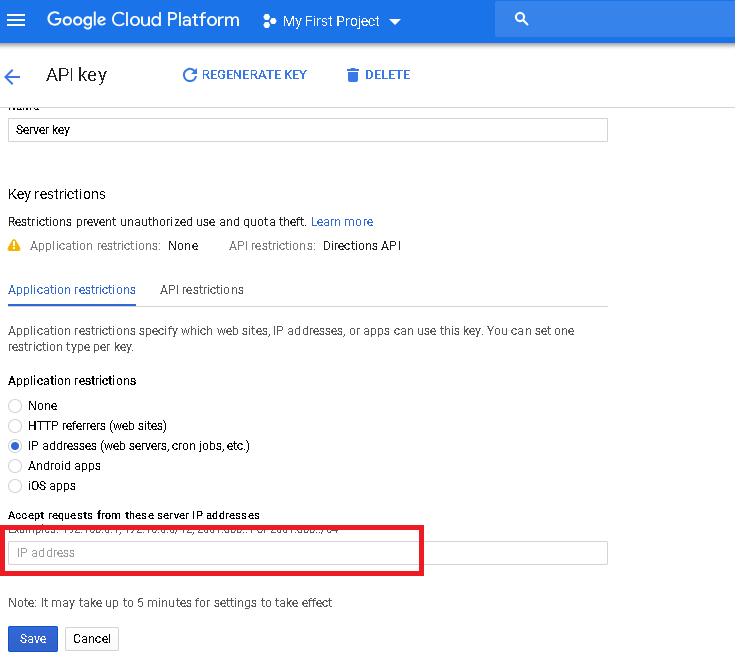
You should restrict your API keys, you will see below options for restriction
1) None
2) HTTP referrers (websites) >> This will act as Browser API key
3) IP addresses (web servers, cron jobs, etc.) >> This will act as Server API key
4) Android apps
5) iOS apps
For Browser API key, you have to set as referrer your website's URL.
For Server key restriction select "IP addresses (web servers, cron jobs, etc.)" radio restriction. Here you have to add your Server IP address so the key can be used by your Server only.

You have to add these keys at Backend > Taxi Booking > Settings > Map settings.
It may take around 10 mins for those changes in Google Developer console to take effect.
Please make sure that you enter correct Browser and Server API keys at Taxi Booking > Settings > Map Settings.
Also please set "SSL Enabled?: Yes".
Other options in Taxi Booking > Settings > Map settings:
Show Map on Address search: Yes/No - if set to Yes, the Map will be shown when the Address search service type is selected by the customer.
Show Map on Special offers: Yes/No - if set to Yes, the Map will be shown when the Special offers service type is selected by the customer.
Show Map on Shuttles: Yes/No - if set to Yes, the Map will be shown when the Shuttles service type is selected by the customer. Note that no route will be shown when Shuttle stops are selected so it's best to leave this setting to "No".
Map height - the height of the map in pixels.
Map zoom level - the zoom of the map on the scale 1 to 10.
Directions height - in the past it was common to have the directions printed under the map, these were the times when Sat Navs (GPS devices) were not very popular. Now Directions are rarely needed. Keep this setting to 0 so no directions are shown.
SSL enabled?: Yes/No - keep this to Yes as it is a requirement by Google to show the Map only over a secured connection.
API Browser key - paste your API browser key here, see instructions above.
API Server key - paste your API server key here, see instructions above.
Business client ID - optional, if you have a business account with Google you can provide the ID here. Only useful for analytics purposes but not mandatory.
Business client signature - if you would like to use Business ID make sure you add the correct signature here or the system will not work at all.
API avoid: Ferries, Highways, Tolls - multiple option selection. Google allows you to select some infrastructures that can be avoided. Hold Ctrl and click to select multiple options.
Show Stops: Yes/No - Google allows up to 8 stops along the way, select Yes to allow the customer to add more than one stop to their journey.
Use POI in stops: Yes/No - if you select Yes here all POIs that you have created on the system will be shown here as a dropdown for quick selection.
Use Address in stops: Yes/No - if you select Yes then the Address autocomplete suggestion will be available for the customer to type in their desired stop address.
Max stop time (in hours) - this is the maximum time that the vehicle can spend at any one stop along the route.
Stop duration interval: 15 minutes, half hour, one hour - single selection dropdown that will be added automatically to the whole journey for each stop added by the customer.
Charge per minute: - the price per minute spent at each stop selected by the customer.
Optimize stops: Yes/No - if you select Yes here the route will be optimized by stops to the shortest route (the shortest time from starting pick up to finishing drop off) regardless of the order stops were picked by the customer.
