Additional information
- Details
- Written by M. Kanev
- Hits: 12892
Due to Google Maps API changes on 16th fo June 2018, all websites using Google Maps API have to use Google Maps API keys.
You must get 2 separate keys from Google Developer Console.
Create or select a project.
Click on Enable APIs. Create a project and enable the following Google Maps APIs:
- Google Maps Directions API
- Google Maps Geocoding API
- Google Maps Geolocation API
- Google Maps JavaScript API
- Google Maps Places API for Web
Then go to Credentials > Create credentials > API key.
On the Credentials page, get an API key (and set the API key restrictions).
Note: If you have an existing unrestricted API key or a key with browser restrictions, you may use that key.
To prevent quota theft, secure your API key following these best practices.
You should restrict your API keys, you will see below options for restriction
1) None
2) HTTP referrers (websites) >> This will act as Browser API key
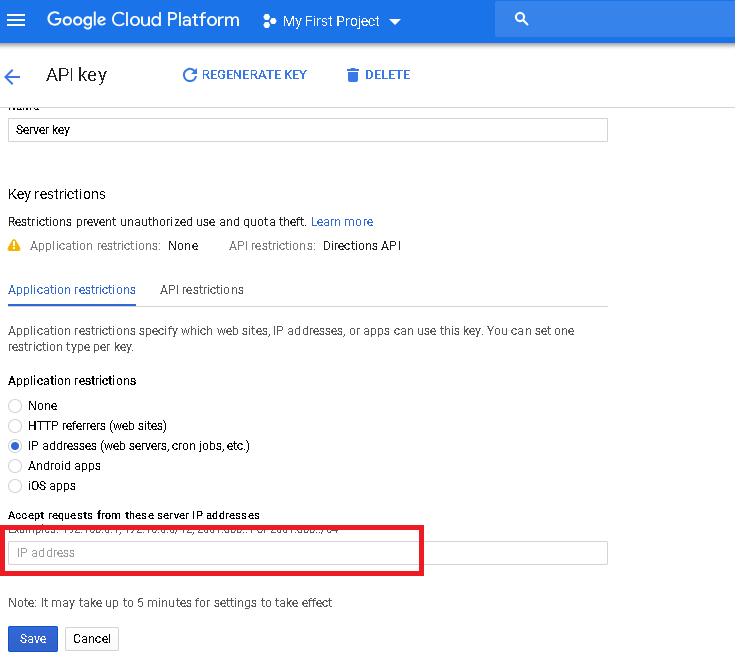
3) IP addresses (web servers, cron jobs, etc.) >> This will act as Server API key
4) Android apps
5) iOS apps
For Browser API key, you have to set as referrer your website's URL.
For Server key restriction select "IP addresses (web servers, cron jobs, etc.)" radio restriction. Here you have to add your Server IP address so the key can be used by your Server only.
You have to add these keys at Backend > Taxi Booking > Settings > Map settings.
It may take around 10 mins for those changes in Google Developer console to take effect.
Please make sure that you enter correct Browser and Server API keys at Taxi Booking > Settings > Map Settings.
Also please set "SSL Enabled?: Yes".
Other options in Taxi Booking > Settings > Map settings:
Show Map on Address search: Yes/No - if set to Yes, the Map will be shown when the Address search service type is selected by the customer.
Show Map on Special offers: Yes/No - if set to Yes, the Map will be shown when the Special offers service type is selected by the customer.
Show Map on Shuttles: Yes/No - if set to Yes, the Map will be shown when the Shuttles service type is selected by the customer. Note that no route will be shown when Shuttle stops are selected so it's best to leave this setting to "No".
Map height - the height of the map in pixels.
Map zoom level - the zoom of the map on the scale 1 to 10.
Directions height - in the past it was common to have the directions printed under the map, these were the times when Sat Navs (GPS devices) were not very popular. Now Directions are rarely needed. Keep this setting to 0 so no directions are shown.
SSL enabled?: Yes/No - keep this to Yes as it is a requirement by Google to show the Map only over a secured connection.
API Browser key - paste your API browser key here, see instructions above.
API Server key - paste your API server key here, see instructions above.
Business client ID - optional, if you have a business account with Google you can provide the ID here. Only useful for analytics purposes but not mandatory.
Business client signature - if you would like to use Business ID make sure you add the correct signature here or the system will not work at all.
API avoid: Ferries, Highways, Tolls - multiple option selection. Google allows you to select some infrastructures that can be avoided. Hold Ctrl and click to select multiple options.
Show Stops: Yes/No - Google allows up to 8 stops along the way, select Yes to allow the customer to add more than one stop to their journey.
Use POI in stops: Yes/No - if you select Yes here all POIs that you have created on the system will be shown here as a dropdown for quick selection.
Use Address in stops: Yes/No - if you select Yes then the Address autocomplete suggestion will be available for the customer to type in their desired stop address.
Max stop time (in hours) - this is the maximum time that the vehicle can spend at any one stop along the route.
Stop duration interval: 15 minutes, half hour, one hour - single selection dropdown that will be added automatically to the whole journey for each stop added by the customer.
Charge per minute: - the price per minute spent at each stop selected by the customer.
Optimize stops: Yes/No - if you select Yes here the route will be optimized by stops to the shortest route (the shortest time from starting pick up to finishing drop off) regardless of the order stops were picked by the customer.
- Details
- Written by M. Kanev
- Hits: 22684
Taxi Booking for Drivers - no app needed, Accept or Decline jobs through email.
Drivers extension for Taxi Booking adds Drivers management and new functionality.
Taxi Booking Drivers is a separate package that you need to install in addition to Taxi Booking for Joomla extension on your website.
After you install the extension you can go to your back end > Components > Taxi Booking Drivers.
There are 2 sections:
1. Settings:
Turn On automatic Driver notification: Yes/No - when you set Yes here Drivers will automatically receive Order notifications to Accept or Decline jobs through their email.
Send email to next driver in (mins): - Enter wait time in minutes. If the Driver does not Accept or Decline a Job in the time frame you set here then the next driver in line will automatically receive a notification email. After that time has passed the first driver will see an Error message if clicks on the Accept or Decline buttons in their job notification email.
Note: Don't forget to Save the screen if you have made any changes.
2. Drivers - this section will only display a list of all your drivers. Clicking on a driver will take you to Users > Edit user screen where you can edit some of the Driver's details.
After you install Taxi Booking for Drivers in Car management you will be able to assign each Car to only one Driver.
Price: £39.99 £19.99 (this is an extension of Taxi Booking for Joomla and is compatible with Joomla 3.x websites only)
If a driver is already assigned, he/she will disappear from Drop down list for other cars.
When a new Order is submitted at the front end Drivers who are assigned to the same Car type will receive a chain email.
Car with lowest ID receives the first email and if Driver clicks Accept, Order is assigned to him/her.
If the Driver clicks Decline the Order is emailed to the next Car ID in the chain.
Order is Waiting before being Accepted by the Driver, after he/she accepts status changes to Accepted - emails are sent to the customer and admin(s).
To get your system sending Accept/Decline emails to the next driver in the driver chain (if a driver has not responded in the given time in your settings) you will have to add a Cron job to your Hosting control panel (contact your hosting support if adding cron jobs is not obvious or you have troubles with that setting). Your cron job should be triggered every 5 mins and if you use "wget" it should look similar to:
*/5 * * * * wget -O /dev/null "http://YOURDOMAIN.COM/index.php?option=com_
Replace "YOURDOMAIN.COM" with your actual website.
Looking for WordPress taxi plugin?: Taxi Booking for WordPress
- Details
- Written by M. Kanev
- Hits: 12030
Taxi Booking Corporate is a package of a Client Account management Component and Invoice later Payment plugin.
With Taxi Booking Corporate you can allow your larger clients to pay for all orders once a month (monthly invoices containing all orders created and emailed automatically at the end of the month) or send them manual reminders to pay for a few orders that have been accumulating over a period of time.
When Invoice later Payment plugin is enabled and Payment you can assign Discounts for users set as Clients.
Client accounts can have one main Client who will receive and pay for invoices and Additional users who can make bookings on behalf of the client and their orders will be added to the main Client invoice.
Here is a tutorial on installation, set up and management of Taxi Booking Corporate:
- Details
- Written by M. Kanev
- Hits: 4017
Taxi Booking package is downloadable from User menu > My Downloads > Taxi Booking releases > Taxi Booking version > View files > Download now or Direct link (for installation from URL). Once you install the package, Taxi Booking component, Taxi Booking module, Payment and scheduling plugins will be all installed at once.
To find the Taxi Booking module go to your website's back end > Extensions > Module manager and type "taxibooking" in the search bar or look for module type "Taxibooking".
Once you locate the module click on it and you will see the configuration screen:
- Details
- Written by M. Kanev
- Hits: 5599
You can set up unlimited number of Coupon codes and distribute them outside of Taxi Booking for various customer groups to use. All they have to do is copy and paste the Coupon code at the last step of the booking process before payment is taken. The system will show the customer discounted value and the discounted value will be used as Total for the booking. Coupon codes will be displayed in the confirmation emails and PDF receipts.
Here are the settings of Coupon codes explained with ideas for various use:
Once you go to back end > Taxi Booking > Coupon codes you will see a list with previously created Coupon codes. If you click on a Coupon code's Title you will get into the Edit mode or you can click on New to create a new coupon code.
There are 2 sections for Coupons that you can set up: Basic settings and Fine tuning. In Joomla 3 they are displayed as separate tabs.